树莓派 python 使用 PCF8591 读取声音传感器数据
知识点
运用树莓派连接PCF8591芯片将声音传感器的模拟信号转换成数字信号。(PCF8591芯片最大的特点就是将模拟信号转换成数字信号)
工具
1.树莓派 1
2.PCF8591 1(使用AIN读取模拟信号时,要把跳帽拔下来)
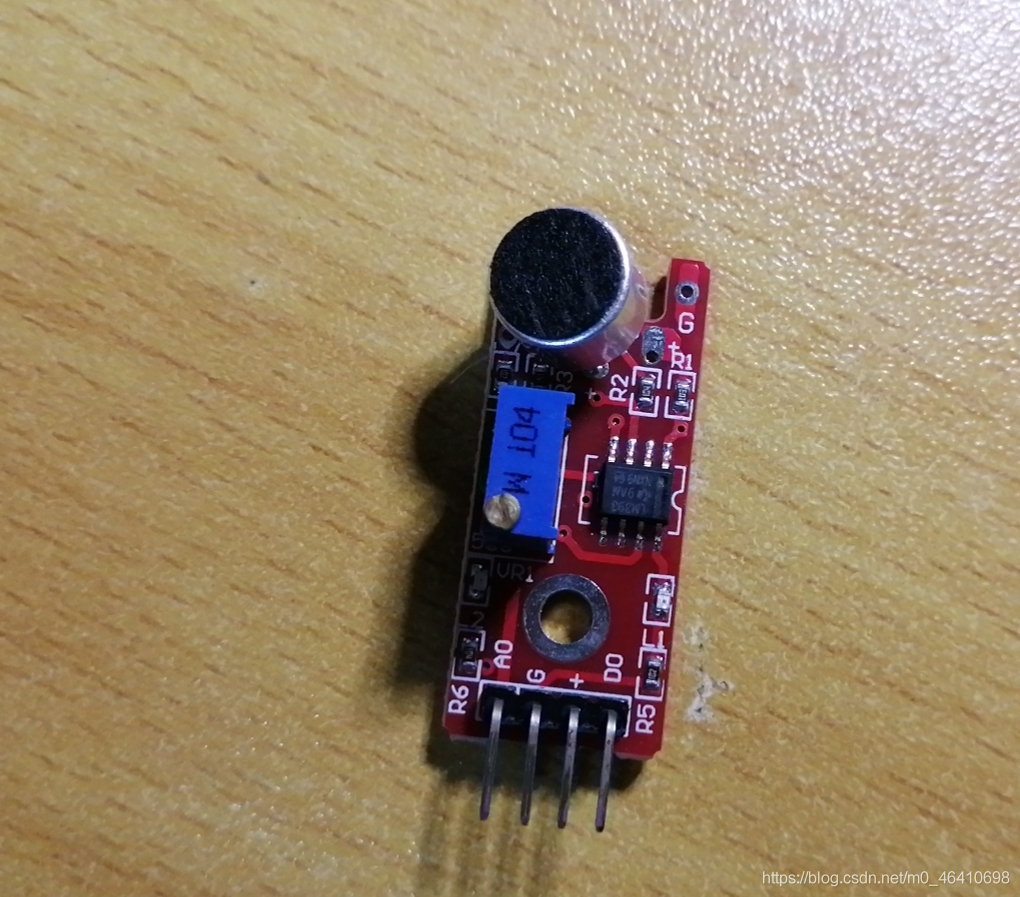
3.声音传感器 *1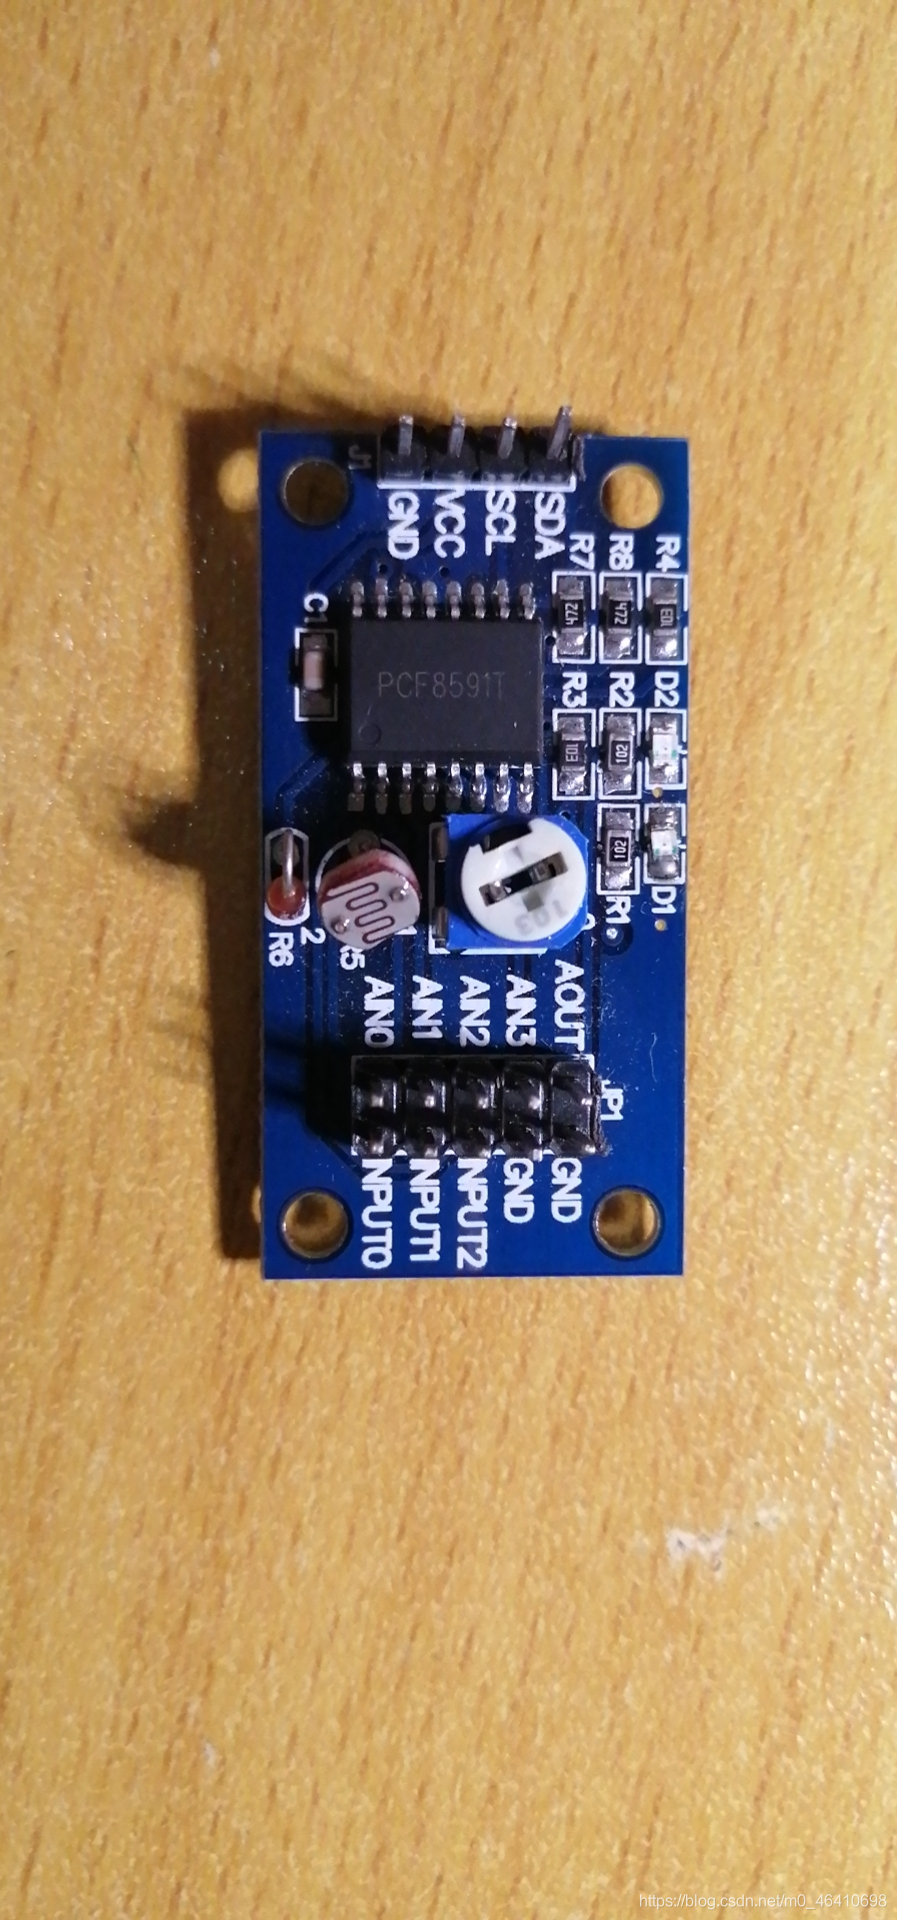
接线
| 麦克风 | PCF8591 | 树莓派 |
|---|---|---|
| A0 | AIN0 | * |
| * | SCL | SCL |
| * | SDA | SDA |
| * | GND | GND |
| * | 3V | 3V |
| 5V | * | 5V |
如果使用四路外部电压输入,需要将3个红色段路帽都取下
代码
PCF8591.py
import smbus
import time

# 对应比较旧的版本如RPI V1 版本,则 "bus = smbus.SMBus(0)"
bus = smbus.SMBus(1)

#通过 sudo i2cdetect -y -1 可以获取到IIC的地址
def setup(Addr):
    global address
    address = Addr

# 读取模拟量信息
def read(chn): #通道选择,范围是0-3之间
    try:
        if chn == 0:
            bus.write_byte(address,0x40)
        if chn == 1:
            bus.write_byte(address,0x41)
        if chn == 2:
            bus.write_byte(address,0x42)
        if chn == 3:
            bus.write_byte(address,0x43)
        bus.read_byte(address) # 开始进行读取转换
    except Exception as e:
        print ("Address: %s" % address)
        print (e)
    return bus.read_byte(address)

# 模块输出模拟量控制,范围为0-255
def write(val):
    try:
        temp = val # 将数值赋给temmp 变量
        temp = int(temp) # 将字符串转换为整型
        # 在终端上打印temp以查看,否则将注释掉
        bus.write_byte_data(address, 0x40, temp)
    except Exception as e:
        print ("Error: Device address: 0x%2X" % address)
        print (e)

if __name__ == "__main__":
    setup(0x48)
    while True:
        print ('AIN0 = ', read(0))
        print ('AIN1 = ', read(1))
        tmp = read(0)
        tmp = tmp*(255-125)/255+125 # 低于125时LED不会亮,所以请将“0-255”转换为“125-255”
        write(tmp)
# time.sleep(0.3)这里,由于树莓派中没有PCF8591的库文件,所以首先应该添加PCF8591的py文件到树莓派中,这里我也在网上找的PCF8591的库文件(提取码:0000),大家可以自行下载。下面,就是要在刚刚下载好的文件夹里,再新创键一个.py文件作为我们接下来要写的主程序。
再写主程序之前,我们需要确认树莓派的IIC是否有打开,首先点击树莓派最左上角的图标,如下图所示: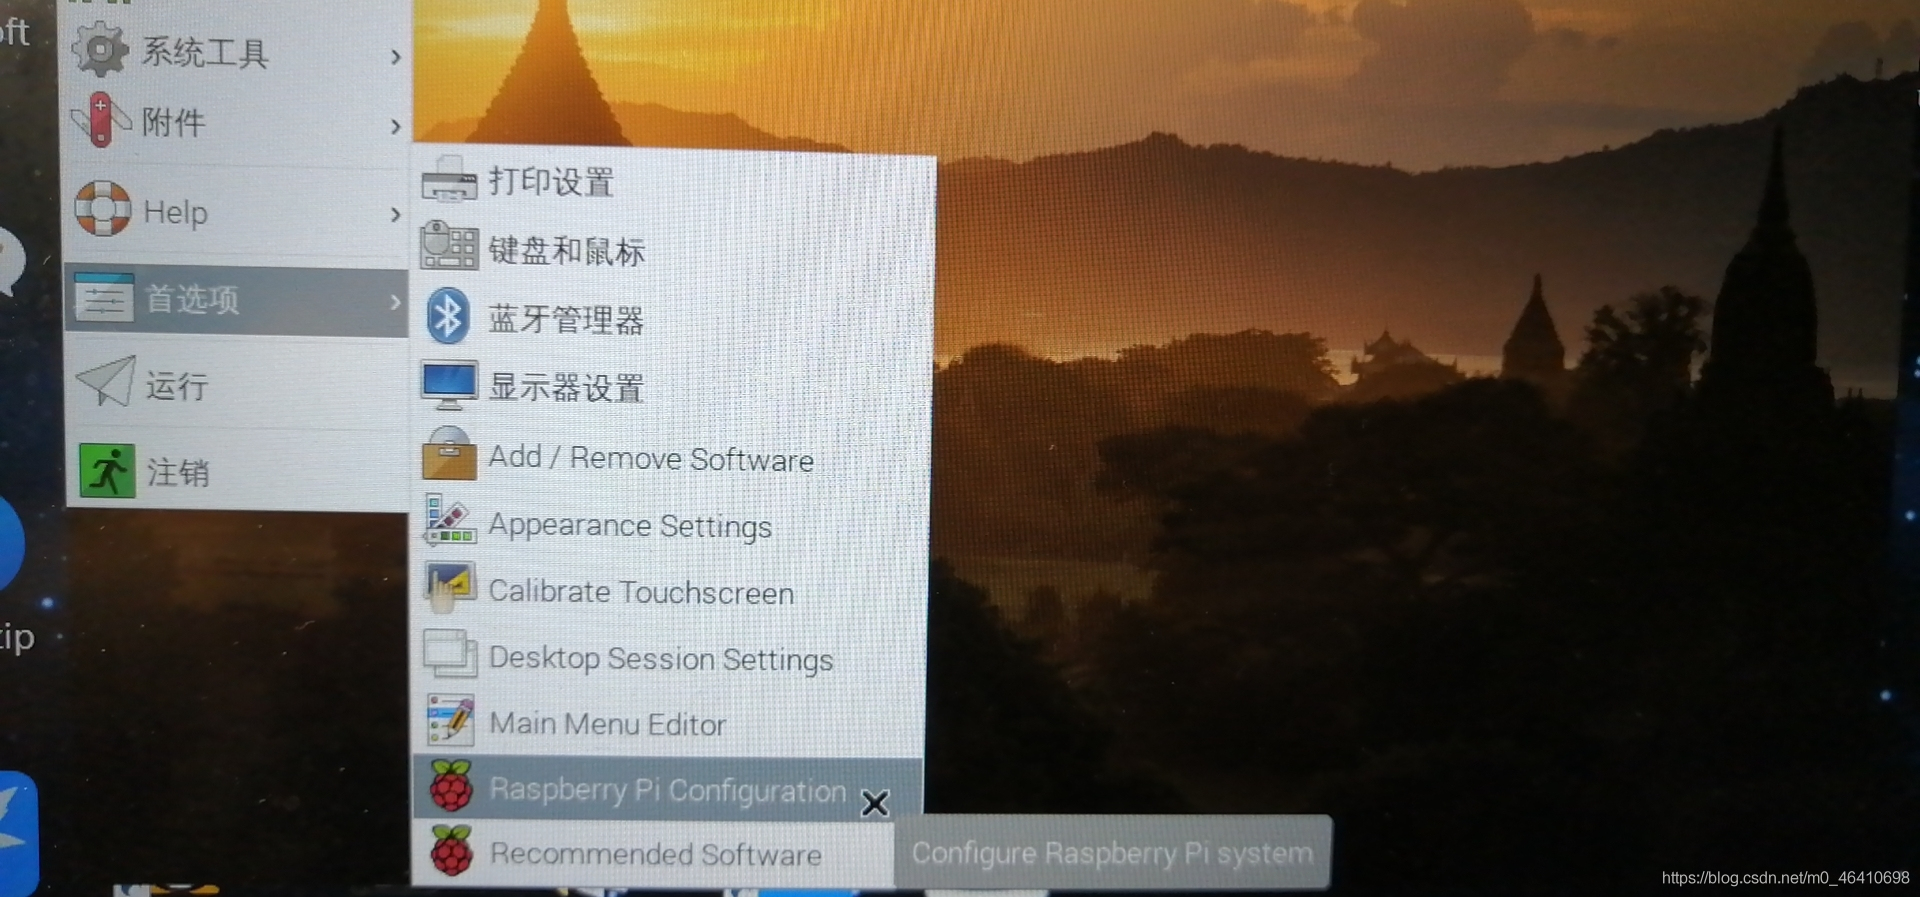
之后,点开raspberry pi congifuration得到下图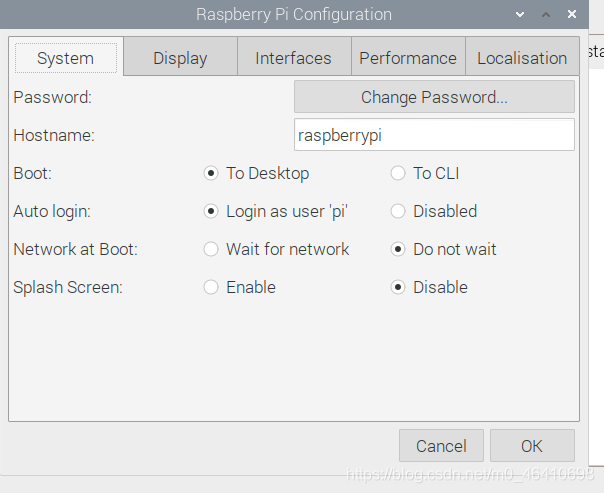
在找到interfaces点开,找到IIC,SPI这两个将它们Enable,
或者使用命令
sudo raspi-config完成以上步骤后可能要将树莓派重启。重启过后,我们将树莓派与PCF8591,声音传感器连接上线,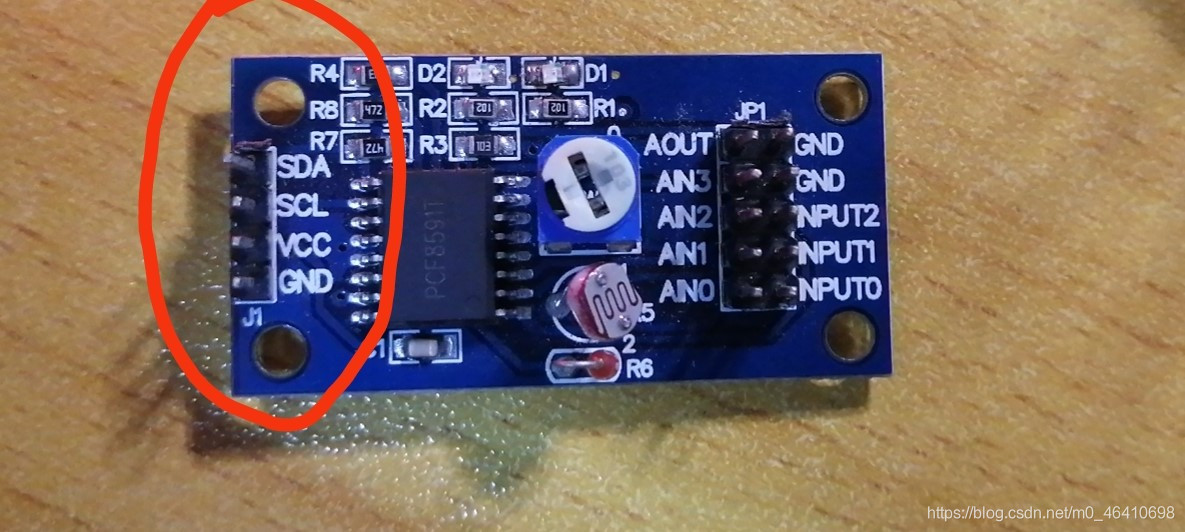
我画红圈的地方是只要你用到PCF8591就得在树莓派或其他设备接上线的,然后再用AIN1接上声音传感器的A0处,声音传感器的+,G处再接的上高低电平。
当接线完成后,打开终端并输入i2cdetect -y 1,可能得到如下图:
如果提示找不到命令
sudo apt-get install i2c-tools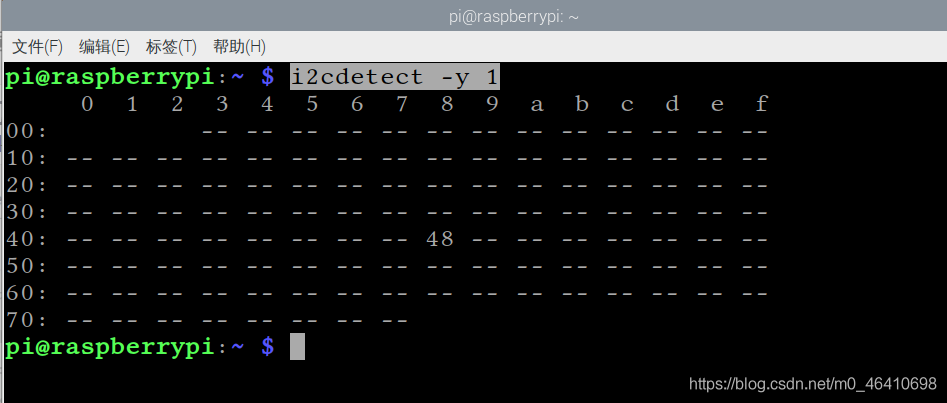
这一步是找到属于IIC总线打开后你设备的地址,所以写程序首先要给对你的设备地址PCF8591.setup(0x48),这个0x48对应上你上面查到的你自己的设备地址,然后就是读取读取AIN1的数值PCF8591.read(1),这里1对应AIN1的接口。
完整代码:
import PCF8591
def loop():
    while True:
        if PCF8591.read(1) < 50 :
            print (PCF8591.read(1)) #读取AIN1的数值
        elif PCF8591.read(1)>50:
            print("noises!")

if __name__ == "__main__":
    try:
        PCF8591.setup(0x48) #首先设置设备地址
        loop()
    except KeyboardInterrupt:
        GPIO.cleanup() #释放AOUT端口
#!/usr/bin/python
# -*- coding:utf-8 -*-
import smbus
import time
import math
# i2c设备地址
address = 0x48
#选取通道
A0 = 0x40
A1 = 0x41
A2 = 0x42
A3 = 0x43
bus = smbus.SMBus(1)
def _read_mic():
bus.write_byte(address,A0)
bus.read_byte(address)
value = bus.read_byte(address)
value = 255 - value
return value
def read_mic(x):
value_list = []
for i in range(0, x):
value_list.append(_read_mic())
ave = sum(value_list)/x
dis = 0
for value in value_list:
dis += math.pow(value - ave, 2)
dis = math.sqrt(dis/x)
return dis
def print_bar(value, in_max, out_max):
value = int(value / in_max * out_max)
print('%s '%value, end='')
for i in range(value):
print('#', end='')
print('')
while True:
# 每10次采样求均值
value = read_mic(10)
print_bar(value, 80, 50)
# print(value)
# print('')
time.sleep(0.001)以上就是树莓派关于声音传感器的用法。